Selasa, 15 November 2011

Bungkus Bantal yang Ammmazing

0 Comments

On the other hand, I elected to make something similar to their wonderful Ruffled-Circle pillow shams:


Image from West Elm

I thought it would be a great look to complement my youngest daughter's new duvet cover, however, I wasn't sure the WE white would match it, I didn't like the way the ruffled circle is cut in half on the West Elm standard sham, and the european sham is the wrong size. So, I stared at their photos for a while and made my own version:


Here we go: West Elmish Ruffled Circle Pillow Sham How-To:

First I grabbed an existing pillow sham from my daughter's bed and measured it. It was 25 x 20 inches. Then I hopped on my favorite design tool, my Mac. I drew a layout to size like so:

Next step was to root around in my fabric shelves to find some likely looking white fabric. Allowing for a half inch seam, I cut the following pieces:
  1. Two 21 x 26 inch rectangles for the front (one for the top, and one for the backing) and also a piece of cotton batting to match
  2. One 21 x 22 inch rectangle for the envelope back
  3. One 21 x 12 inch rectangle for the other side of the envelope back
I pressed the edges of the two envelope back pieces over half an inch, then another half an inch and sewed it down to create a finished edge. I set them aside.


Next was a boatload of bias cut strips for the ruffled circles. (Bias cut because there was no way I was going to finish the edges. Raw bias strips don't fray a lot). I laid my yardage on the floor and pulled a corner over like so:


Then I cut along that fold. This new cut edge was on the bias. Then I cut 2 inch strips from those bias edges until I had what looked like a really ridiculous amount. Turns out 225 inches was not even enough to complete the larger ruffle circle, so I had to cut more. (How much you need may vary depending on how tightly you ruffle the strips, but more about that in a minute.) I figured 2 inches wide would allow for the strips to fray a bit in the wash and still look fluffy. If you look closely at the West Elm photos, I'm pretty sure their strips were not that wide. You can vary it as you like.

I sewed all my bias strips together end to end. Here's how you do that:


Ok. This is where your results may vary. I used my ruffler attachment to gather the strips. I didn't want to hand gather a strip that long because, well, I hate gathering. With every fiber of my being. If you have a ruffler attachment, by all means dust it off and put it on. This is where it shines, man.


I used a stitch length of 2.5 and the 6 setting on the ruffler (meaning a tuck is taken every 6 stitches). Then I just fed the strip through and watched it do all the pretty tucks for me. One thing you want to keep an eye on is the needle itself. It can work loose after a little while from the action of the ruffler and you don't want it to fall out mid-stitch. Like I did.
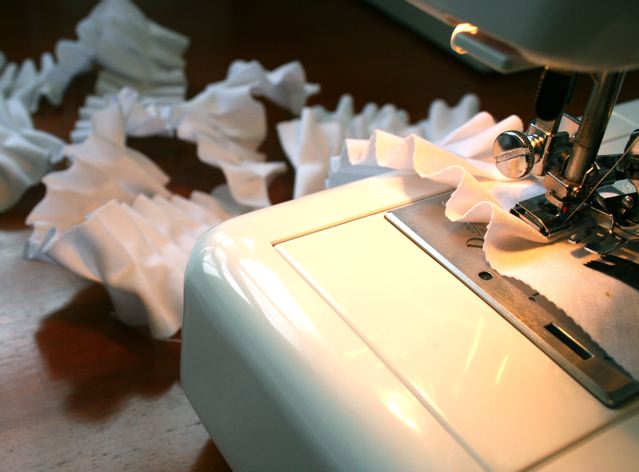
 

So you don't have a ruffler? You can cheat too. You can use a gathering foot, or if you don't have one of those you can experiment on a test strip by increasing your stitch length and tightening the tension until your machine is making gathers by itself as you sew. It will really help if your bias strips are a lightweight fabric.

After ruffling all the strips I pressed them in half along the seam.


Next step was to assemble the sham top. I used my fancy compass (from a drafting course in college) with a pencil lead in it to draw concentric circles in position on the sham top piece, like so:


Each nested circle is an inch apart from the next. Then I also drew in my quilting lines with an air soluble marker. I sandwiched the batting between the sham top and the sham top backing, pinned (a lot), and sewed along the quilting lines only, working from the center outward. (Do not sew the concentric circles).


I used fabric glue to tack down the center seams of the ruffled strips to the concentric circles. Beginning with a tight circle in the center, I worked my way around and outward. I tucked the end under when I completed the circle.


Then I used the machine to stitch each ruffled circle in place.

Now to put it all together. First I squared up the sham top. Then I aligned the envelope back pieces right sides together to the sham top and pinned. Using a half inch seam, I sewed all the way around.


Lastly I snipped the corners, turned it, stuffed it with a pillow and viola! The West Elmish look I wanted for her new bed.

I have to say, after making this sham with the 14 miles of bias strip to ruffle, the WE version looked a lot more attractive, and according to my sliding scale I think the $30+shipping they want for their sham is a pretty fair deal.

But having said that, the one I made still wins with me because 1) it's the style/exact color I wanted, 2) I was able to make it from my stash in more durable fabric for zero dollars, 3) it is something special from her mom that my daughter loves!

Sumber : http://kojodesigns.blogspot.com/2011/04/sincerest-form-of-flattery-guest-mmm.html

Membuat Kartu Owl

0 Comments

Larissa writes...

Left: art made with this tutorial, Right: art made with alternate colors
(see note at the end of the tutorial)
Hey, Craft Campers! I'm delighted to participate in this summer kid-craft lineup.
This 3D paper owl art project is for you and your crafty older kids, say around 11-ish years and up, who can wield a pair of scissors, handle smallish pieces and follow placement instructions carefully. Finished size of the art project is 8 x 10 inches.
Moms: You can definitely young this down by cutting out the shapes for younger kids, and skipping the pop dots and folding. Just cut off the folded flaps. You could also make just the owl and skip the whole background, and it will still be plenty o' fun!

Alrighty young crafters, here's what you will need to make the nighttime owl pictured above:
  • my PDF download with all the pattern pieces (get it here)
  • printer
  • ruler
  • clear tape
  • butter knife for scoring
  • 8.5 x 11 piece of poster board (you can cut one from a larger piece)
  • 8.5 x 11 inch heavy scrapbooking paper in the following colors: orange, brown, dark teal, black, light brown, red, and yellow. (if you want to make a daytime owl, see note at the end)
  • scissors
  • glue stick
  • gel paper glue for the small pieces
  • 1 inch circle punch and 5/8 inch circle punch (see templates on the first page of the PDF file if you don't have a punch)
  • 1/2 inch diameter (1/8 in. thick) round pop dots
  • white or gray colored pencil
  • bold sense of crafting adventure
Got all that together? Let's make some mad paper art.
Step 1: Print out the pattern pieces!

Make a test print of the first page on regular paper and measure the guide box with a ruler to be sure you are printing at the correct size.
Once you are sure the scaling is good, follow the instructions on each page to print them on different colors of paper. You won't be printing on your yellow paper. NOTE: some will be printed on the front and some on the back of the page! If your paper is not textured and looks the same on both sides, don't bother with this.
Step 2: Score all your folds.
(the hand that would be holding the ruler was taking the picture, but you get the idea.)
There are three folds to score, two on the brown paper and one on the orange paper. Line up your ruler against the dotted line, and firmly score along the line using your butter knife. Do this a couple of times. This is making a nice dent in the paper so that when you bend the paper your fold will be easy and clean.
Step 3: Cut out one each of your pattern pieces with scissors.

Some of the pages will have duplicate pattern pieces, but these are extras just in case you mess up. When it comes to cutting, slow and steady wins the race. Here are some cutting tips for you:
  • Rough cut shapes away from the rest of the page first. Then cut them out on the lines.
  • Don't try to cut the whole shape in one continuous direction. Cut it in stages and from different directions to make it easier.
  • Cut inward-facing angles first from one side to the point, then from the other side to the point, and let the pointed piece fall out.
  • Turn your paper in your hand as you cut curves.
  • Remember it doesn't have to be perfect to look awesome!
Step 4: Punch out some circles.

Using a 1 inch punch, make three yellow circles. Using a 5/8 inch (or 1/2 inch) punch, make two black circles. Set them aside with the rest of the pieces.
If you don't have circle punches, use a compass or you can print the templates provided on the first page of the PDF file.
Step 5: Put the background together.

Use the glue stick on the back (the side with the lines) of the 8 x 10 inch dark teal piece. Get glue on all the edges and then zig zag it down the middle. Now place it on the letter sized piece of posterboard. It will probably stick better on the non-shiny side of the posterboard. Don't worry about lining it up with the edges, you'll be trimming the extra off. After you smooth it down, trim the extra poster board off the edges.

Use the glue stick on the back of the large black piece (the side without the oval on it). Carefully line it up with the left, top and bottom edges. Smooth it down.
Step 6: Put the owl together.
Hard to see here, but the guidelines will be showing on the red.
Use the glue stick on the back of the red oval (the side with no lines). Line it up with the oval guideline on the black piece and smooth it down. (Hopefully even though this is black paper you will still be able to see the guideline on the black like I can.)


Put two single pop dots on the back of the orange wing where shown. Line up the wing with the guideline on the red oval and stick it down. Ooh. It's 3D.


Cut a pop dot into quarters with scissors. Yep, that is small, but you don't want the pop dot to show from behind the beak. Put one tiny pop dot piece on the back of the black beak and place the beak on the light brown ruff using the guideline.

Use gel glue (less is more) on the black circles and place them in the center of two of the yellow circles. Now you have two owl eyes! Wait a minute or two for the gel to dry.

Place one pop dot in the middle of the back of both eyes. Stick them down over the guidelines on the light brown ruff piece.

Flip over the light brown ruff and put two single pop dots on the back. Place it on the red oval on the guidelines.

Now for the triangular orange...ears. Or whatever they actually are. Anyway, they look like ears. Fold the scored flap toward the pop dot side. Place two double pop dots where shown by the guide (double means two that are stacked together).

Flip it over and place it on the owl's head, centered with the beak and lined up with the remaining guideline. Man! Your owl looks wicked fierce. Make some hooing noises. You know you want to.
Step 7: Put the tree trunk together.

Flip your tree trunk pieces over to the blank side. Now, summon up your artistic muse and use a white or gray colored pencil to create bark lines all down the tree trunk. Curve them around the knot hole. Groovy. Very tree-like.
Fold the scored flaps toward the back and crease them. Unfold them.

Lay the left tree trunk bark side down, lined up to the left edge of the background. Tape it where the edges meet.

Place a stack of four pop dots on each place indicated.

Crease your flap again, then fold the whole piece carefully over and stick it down over the owl, making sure your fold is at right angles. Don't push it firmly down until you are sure the side is straight up and down.

Now repeat those steps for the other side, except this time line the right tree trunk up to the edge of the black paper on the right (NOT the edge of the art). Tape it where the edges meet. Place a stack of four pop dots on each place indicated.


Fold it over and stick it down over the owl, making sure your fold is at right angles before you press it down. The tree pieces should overlap slightly and hide the bottom of the owl. Voila! You are almost done!
Step 8: Put the moon and trees on.


Trim off 1/4 inch of the side of the remaining yellow circle. Put a pop dot on the back. Place it about an inch down from the top on the teal background, with the cut side against the tree trunk.

Put pop dots on the back of the black trees piece, three or four singles should do it. Place it lined up against the bottom edge and against the tree trunk.

Your awesome piece of 3D paper art is done! Step back and admire it. Whoooo's a paper artist? You are, that's who!
Want to do it again? Here are more options:

  • Try it again using light blue paper for the sky and green for the small trees to make it seem like day-time! Add rays to the moon to make it a sun. Maybe add a cloud or two. You could make the owl's eyes closed by layering a semi-circle on top of a circle. Owls like to sleep during the day! (Hmm. Kind of like kids who are out of school.)
  • Try making just the owl in different colors as decorations for your room.
  • Use your leftover paper pieces to create more paper art of your own design or recycle them.
  • Your finished owl art can be displayed in an 8 x 10 shadowbox frame or by itself.

sumber :http://www.skiptomylou.org/2010/06/20/3d-paper-owl-from-mmmcrafts/

Membuat Mesenger bag

0 Comments

hmm... pengennya mah bikin tutorial...
tapi belum bisa hehe..
jadi copas dari yang orang dulu ajah...


the basic messenger bag

Jamie's on the left, Chelsea's on the right. This tutorial does not include the flap designs, alas.

As promised, here is the basic bag tutorial like the one I made Jamie and Chelsea. I have not included the flap designs, just the basic bag. That will have to be another post. Be creative and come up with your own flap variations. Then show me! Jamie's was applique only, and Chelsea's was a combo of piecing and applique. I have another one to sew up for my sister Lori's birthday and I'm going to do some patchwork this time.

I considered doing a PDF of the pattern pieces, but they are mostly too big to fit on letter sized paper, and pretty easy to make yourself if you have a ruler, a 6.5 inch circle, and a coffee cup on hand. The coffee cup is to hold some hot coffee. Obviously.

Click on the image below to see or print a larger diagram for measurements. This is not to scale.


YARDAGE: Assuming the width is 45 inches, you'll need about a yard each of the outside and the liner, plus your interfacing if you are using it.

THE FINISHED BAG DIMENSIONS, EXCLUDING THE STRAP:
about 12 inches x 12 inches x 3 inches wide at the bottom.

1/4 INCH SEAM ALLOWANCE IS INCLUDED IN THE MEASUREMENTS. If you are more comfortable with a larger seam allowance, be sure to add that when you draw your pattern.

Draw and cut out all your paper pattern pieces. Draw a rectangle for the flap, then use a 6.5 inch circle to trace the curved corners on the flap. I have an obliging embroidery hoop that is just the right size.

Now trace and cut out your fabric.

NOTE: If your main fabric is not a heavy, purse-worthy weight you should consider adding a fairly stiff fusible interfacing on the strap, outside body, and outside flap pieces. Cut out the interfacing in the same size as those pieces, and iron it on according to the manufacturer's instructions. But remember, you are going to have to turn this bag through a 5 inch hole, so the interfacing shouldn't be too stiff for that.

NOTE YET AGAIN: Even if I don't specifically mention it below, you'll be of course pressing and finishing your seams in your preferred method for each step.

1) Strap. Press it in half, right sides together, longwise so you have a 2 x 45 inch piece. Sew it closed along the long edge. Turn it right side out (use a hugemongous safety pin like I do to help with this. Or if you have a fancy tube-turner, by all means, get that thing in action). Press, then edgestitch down both sides. So now you have a lovely strap with raw ends.


2) Outside Pocket. Align the outside pocket pieces right sides together and sew all around, leaving a couple inches open on the bottom side to turn it. Snip the corners. Turn and press. Pin it to the right side of the body piece, centered side to side and about 3 inches down from what will be the top of the bag. Edgestitch it on the sides and bottom, leaving the top open (obviously) and backstitching at the beginning and end to reinforce.


3) Inside Pocket. Now do the same thing to assemble your inside pocket, but pin it to the right side of the body lining fabric, centered from side to side and about 4 inches down from what will be the top of the bag. Edgestitch it on the sides and bottom, leaving the top open and backstitching at the beginning and end to reinforce. Then stitch again down the center from top to bottom to create two little pockets.


4) Flap. Now is the time to do all your embellishing of the flap on the outside piece BEFORE YOU SEW THE FLAP TOGETHER.

(Musical interlude while this creative wave crashes over you.)

Once your outside flap piece is appliqued or pieced or whatevered, you are ready to proceed.

5) Align the (fabulous) flap outside and lining pieces right sides together. Sew all around, leaving a 3 or 4 inch gap in the middle of the top edge for turning and backstitching at beginning and end. Snip the corners and clip the curves. Turn it and press, turning under the unsewn seam. Edgestitch all the way around. Now you have a lovely finished, but disembodied, bag flap.


6) Lay the flap down right side up on the right side of the body piece (same end as where your pocket is), centered side to side and about 1.5 inches from the top edge. Edgestitch following your previous stitches, then stitch again about a quarter inch from the edge, reinforcing at each end.


7) The Body. Fold the body piece in half, right sides together, so you have a 14 x 12.5 inch rectangle, with the flap tucked inside and out of the way. Pin and sew up both sides.

Finger press or press the bag flat so you have a line that goes down the center of the bottom of the bag. It's just a guideline. You are going to square the corners so your bag has a flat bottom. Heh. Pick it up, bring the side seams together at the top and lay it back down with a corner pulled out and flattened so it looks like a triangle (see drawing below), with the side seam going down the middle of the triangle and lined up with the guideline you pressed in the center of the bottom of the bag. Pin it to keep all that in place and use a ruler to draw an air soluble line at 3 inches across the width, then sew it securely. Now repeat this step with the other corner and also with your lining piece. You can trim off the excess corner or fold it under and tack it to add body to the bottom of the bag.


8) Now is the time to test the strap length. Turn the body right side out with the flap in place. Pin the strap in place on both sides of the bag, centered with the side seams, and with a 3/4 inch overlap. Sling it over your shoulder diagonally across your body. Sashay to a mirror and make any adjustments in strap length so the bag falls in a comfortable place on your opposite hip. Unpin and trim your strap to the new length, being sure to include the 3/4 inch overlap. Now baste your strap on the right side of the body upside down, centered with the side seams, and with the ends sticking out over the top 1/4 inch. (Make sure the strap is not twisted! Because that would be really embarrassing later. Ahem.)


9) Now you need to put the body and the lining right sides together. So turn the lining right side in, and then stuff the body inside that one so that their right sides are facing each other. I like my inside pocket to be on the same side of the bag as the outside pocket, but that is just me. The flap and strap will be stuffed down in between the two layers, so just tuck them in and smooth them down the inside so they stay out of the way of the stitching. Pin the body and lining together at the top, lining up the side seams and the raw edges. The strap ends will be sticking up out of both sides.


10) Sew the body and lining together, reinforcing over the straps, and leaving about 4 or 5 inches open in the center of the flap side for turning. Make sure you backstitch at the beginning and end really well. Turning this stiff fabric puts a lot of stress on your backstitches. Turn your creation and then stuff the lining down inside the bag. Wow. Now it looks like a real bag!


11) Press the seam around the top, rolling it between your fingers to get it as close to the stitching as you can. Press under the seam allowance on the opening. Edgestitch all the way around the top of the bag (don't catch the flap in your stitches. Ahem.). You'll probably need to press the rest of the bag too, because after wrestling it through the hole it tends to look crumpled all over.

Shazam! You are done. Look at that fabulous bag you just made. Bravo!

Sumber : http://mmmcrafts.blogspot.com/2009/06/basic-messenger-bag.html